Sunday, August 23, 2009

LED Controlled by Parallel Port Using C#

This is my first article so if you are facing any problem or any other topic on which you want help then contact me my email address is
osama222_1@hotmail.com

This is my 3rd article for running this program or interfacing the parallel port through VB or C#.NET you need a dll file if you need it then do inform me on my email address or you can find it by your self the name of the dll is inpout32.dll

Parallel Port
A parallel port is a type of interface found on computers (personal and otherwise) for connecting various peripherals. It is also known as a printer port or Centronics port. The IEEE 1284 standard defines the bi-directional version of the port।
Port Address
Traditionally IBM PC systems have allocated their first three parallel ports according to the configuration in the table below.
PORT NAME
LPT1
LPT2
LPT3


Starting I/O
0x3bc
0x378
0x278


Ending I/O
0x3bf
0x37f
0x27f


if there is an unused LPTx slot, the port addresses of the others are moved up. (For example, if a port at 0x3bc does not exist, the port at 0x378 will then become LPT1.)[5] The IRQ lines, however, remain fixed (therefore, 0x378 at LPT1 would use IRQ 7)[citation needed]. Unfortunately the default IRQ used by the first two addresses is the same, and it's difficult to get correct interrupt behavior if both of these addresses are in use. The port addresses assigned to each LPTx slot can be determined by reading the BIOS Data Area (BDA) at 0000:0408.


Parallel port modes
The IEEE 1284 Standard which has been published in 1994 defines five modes of data transfer for parallel port. They are,
1) Compatibility Mode 2) Nibble Mode 3) Byte Mode 4) EPP 5) ECP


The programs, circuits and other information found in this tutorial are compatible to almost all types of parallel ports and can be used without any problems (Not tested, just because of confidence ! ). More information on parallel port operating modes can be found
HardwareThe pin outs of DB25 connector is shown in the picture below
The lines in DB25 connector are divided in to three groups, they are
1) Data lines (data bus) 2) Control lines 3) Status lines


As the name refers , data is transferred over data lines , Control lines are used to control the peripheral and of course , the peripheral returns status signals back computer through Status lines. These lines are connected to Data, Control And Status registers internally . The details of parallel port signal lines are given below


Running Condition


Interface or Layout Design


Code


Note: i just made a class of parallel_port in which i define the function so if you want to run the program then you have to made a class it is very simple just go to project menu then add class from there and the name of the class will be parallel_port and the class code will be given below just paste it and most important thing you must have to download inpout32.dll if you not find it then send me email i will send you i hope you enjyou it.....

Class Code


using System;
using System.Collections.Generic;
using System.Text;
using System.Runtime.InteropServices;
namespace Controlling_home_appliance_SMS
{
class parallel_port_interfacing
{
//Call OutPut function from DLL file.
[DllImport("inpout32.dll", EntryPoint = "Out32")]
public static extern void Output(int adress, int value);
//Call Input functionfrom DLL file
[DllImport("inpout32.dll", EntryPoint = "Inp32")]
public static extern void Input(int adress);
}
class parallel_port
{
public void reset()
{
//heneral addresss are 888 and 632
parallel_port_interfacing.Output(888, 0);
}
public void light1()
{
parallel_port_interfacing.Output(888, 1);
}
public void light2()
{
parallel_port_interfacing.Output(888, 2);
}
public void light3()
{
parallel_port_interfacing.Output(888, 4);
}
public void light4()
{
parallel_port_interfacing.Output(888, 8);
}
public void light5()
{
parallel_port_interfacing.Output(888, 16);
}
public void all()
{
parallel_port_interfacing.Output(888, 31);
}
}
}


Main Form Code

using System;
using System.Collections.Generic;
using System.ComponentModel;
using System.Data;
using System.Drawing;
using System.Text;
using System.Windows.Forms;
namespace Controlling_home_appliance_SMS
{
public partial class Form1 : Form
{
parallel_port led = new parallel_port();
public Form1()
{
InitializeComponent();
}
private void radioButton1_CheckedChanged(object sender, EventArgs e)
{
led.light1();
}
private void radioButton2_CheckedChanged(object sender, EventArgs e)
{
led.light2();
}
private void radioButton3_CheckedChanged(object sender, EventArgs e)
{
led.light3();
}
private void radioButton4_CheckedChanged(object sender, EventArgs e)
{
led.light4();
}
private void timer1_Tick(object sender, EventArgs e)
{

}
private void textBox1_TextChanged(object sender, EventArgs e)
{
if (textBox1.Text == "light1")
{
led.light1();
label4.Text="light "+1+" On";
}
else if (textBox1.Text == "light2")
{
led.light2();
label4.Text = "light " + 2 + " On";
}
else if (textBox1.Text == "light3")
{
led.light3();
label4.Text = "light " + 3 + " On";
}
else if (textBox1.Text == "light4")
{
led.light4();
label4.Text = "light " + 4 + " On";
}
else if (textBox1.Text == "light5")
{
led.light5();
label4.Text = "light " + 5 + " On";
}
else if (textBox1.Text == "all")
{
led.all();
label4.Text = "all lights On";
}
else
{
led.reset();
label4.Text = "";
}
}
private void exitToolStripMenuItem_Click(object sender, EventArgs e)
{
}
private void exitToolStripMenuItem_Click_1(object sender, EventArgs e)
{
Application.Exit();
}
private void panel3_Paint(object sender, PaintEventArgs e)
{
}
private void radioButton5_CheckedChanged(object sender, EventArgs e)
{
led.light5();
}
private void radioButton6_CheckedChanged(object sender, EventArgs e)
{
led.all();
}
private void Form1_Load(object sender, EventArgs e)
{
}
}
}



Friday, August 7, 2009

Bar Code Reader Connectivity using C# or VB.NET

Dear reader this is my second article i think it will be little bit interesting and much easier since bar code reader is so common device lots of market use it to done their transition much faster and reliable through it.if you need some help kindly contact me

osama222_1@hotmail.com


now first i give you a little bit introduction about what is bar code reader and how it gonna works.


How Bar Code Reader Works


There are currently four different types of bar code readers available. Each uses a slightly different technology for reading and decoding a bar code. There are pen type readers (e.g. bar code wands), laser scanners, CCD readers and camera-based readers. To learn about creating bar codes with TALtech software, visit our barcoding products page.


Pen Type Readers and Laser Scanners


Pen type readers consist of a light source and a photo diode that are placed next to each other in the tip of a pen or wand. To read a bar code, you drag the tip of the pen across all the bars in a steady even motion. The photo diode measures the intensity of the light reflected back from the light source and generates a waveform that is used to measure the widths of the bars and spaces in the bar code. Dark bars in the bar code absorb light and white spaces reflect light so that the voltage waveform generated by the photo diode is an exact duplicate of the bar and space pattern in the bar code. This waveform is decoded by the scanner in a manner similar to the way Morse code dots and dashes are decoded.


Laser scanners work the same way as pen type readers except that they use a laser beam as the light source and typically employ either a reciprocating mirror or a rotating prism to scan the laser beam back and forth across the bar code. Just the same as with the pen type reader, a photo diode is used to measure the intensity of the light reflected back from the bar code. In both pen readers and laser scanners, the light emitted by the reader is tuned to a specific frequency and the photo diode is designed to detect only this same frequency light.Pen type readers and laser scanners can be purchased with different resolutions to enable them to read bar codes of different sizes. The scanner resolution is measured by the size of the dot of light emitted by the reader. The dot of light should be equal to or slightly smaller than the narrowest element width ("X" dimension). If the dot is wider than the width of the narrowest bar or space, then the dot will overlap two or more bars at a time thereby causing the scanner to not be able to distinguish clear transitions between bars and spaces. If the dot is too small, then any spots or voids in the bars can be misinterpreted as light areas also making a bar code unreadable. The most commonly used X dimension is 13 mils (roughly 4 printer dots on a 300 DPI printer). Because this X dimension is so small, it is extremely important that the bar code is created with a program that creates high resolution graphics (like B-Coder). For a good description of the different graphic file formats that are commonly used to create bar codes


CCD Readers


CCD (Charge Coupled Device) readers use an array of hundreds of tiny light sensors lined up in a row in the head of the reader. Each sensor can be thought of as a single photo diode that measures the intensity of the light immediately in front of it. Each individual light sensor in the CCD reader is extremely small and because there are hundreds of sensors lined up in a row, a voltage pattern identical to the pattern in a bar code is generated in the reader by sequentially measuring the voltages across each sensor in the row. The important difference between a CCD reader and a pen or laser scanner is that the CCD reader is measuring emitted ambient light from the bar code whereas pen or laser scanners are measuring reflected light of a specific frequency originating from the scanner itself.


Camera-Based Readers


The fourth and newest type of bar code reader currently available are camera-based readers that use a small video camera to capture an image of a bar code. The reader then uses sophisticated digital image processing techniques to decode the bar code. Video cameras use the same CCD technology as in a CCD bar code reader except that instead of having a single row of sensors, a video camera has hundreds of rows of sensors arranged in a two dimensional array so that they can generate an image.
The factors that make a bar code readable are: an adequate print contrast between the light and dark bars and having all bar and space dimensions within the tolerances for the symbology. It is also helpful to have sharp bar edges, few or no spots or voids, a smooth surface and clear margins or "quiet zones" at either end of the printed symbol.


Interfacing a bar code reader to a PC


All application programs support bar code reading as long as you have the right equipment. Bar code readers are available with two types of output - either "keyboard wedge" output or RS232 output. The bar code readers with keyboard wedge output plug directly into the keyboard port on your PC and they also provide a pigtail connector so that you can plug in your keyboard at the same time. When you scan a bar code with the keyboard wedge bar code reader, the data goes into the computer just as if it were typed in on the keyboard. This makes it extremely easy to interface the bar code reader to any application that is written to accept keyboard data. The keyboard wedge interface is extremely simple however it has a few drawbacks. If you swipe a bar code, the cursor has to be in the correct input field in the correct application otherwise you end up reading bar code data into whatever application has the focus. This can cause all sorts of potential problems as you can imagine. The keyboard output also is limited in that you cannot modify the data in any way before sending it into the program that is to receive the data. For example, if you needed to parse a bar code message into multiple pieces or remove some of a bar code message or add in a date or time stamp you would not be able to with a normal keyboard wedge reader. The other possible output option is to get a bar code reader with an RS232 or "Serial" interface. With these types of bar code readers, you connect the reader to an available serial port on the back of your PC. You would then need a program called a "Software Wedge" to take the data from the bar code reader and feed it to the application where you want the data to go. The disadvantage to this approach is that it is a little more complex however you gain much more control over how and where your data ends up when you read a bar code. Our WinWedge product line is designed just for this purpose. WinWedge is an executable program that can pass serial data back and forth to other programs using either DDE (Dynamic Data Exchange) or by converting incoming serial data to keystrokes (i.e. it stuffs the keyboard buffer with the incoming serial data). With WinWedge, you can control exactly where the data goes in the target application and you can also perform all sorts of modifications on the data before it is sent to the application including parsing or translating the data as well as adding additional keystrokes or date and time stamps to the data. WinWedge is extremely easy to use and is designed to have you up and running sending and receiving serial data directly from within your application in just a few minutes. Because WinWedge can pass data using DDE, you can set your application up to insure that the bar code data always goes where it is supposed to go and you can also have your application running in the background and still accept bar code input while you run some other program in the foreground. WinWedge is without question the most robust way to interface a bar code reader to a PC with the least amount of effort.


First drop the timer from the tool box and also the text box for displaying the data


Here its C# Code


using System;
using System.Collections.Generic;
using System.ComponentModel;
using System.Data;
using System.Drawing;
using System.Text;
using System.Windows.Forms;
using System.IO.Ports;
namespace Bar_code_reader
{
public partial class Form1 : Form
{
public Form1()
{
InitializeComponent();
}
//initializing the serial port
System.IO.Ports.SerialPort serial_port = new SerialPort("COM1");
//for data taking or geting data
string data;
//timer diclaraion or drop timer just into your winform form tollbol
private void timer1_Tick(object sender, EventArgs e)
{
//geting data form the buffer
data=serial_port.ReadExisting();
//if data will be found in the string
if (data.Length > 1)
{
//displaying it into the text box
textBox1.Text = data ;
data = "";
}
}
private void Form1_Load(object sender, EventArgs e)
{
//enable the timer
timer1.Enabled = true;
//open the serail port by default it will close
serial_port.Open();
}
}
}

Similarly its design view is same just like C# and its code given below enjoy :)

VB.NET Code

Public Class Form1
Private Sub Form1_Load(ByVal sender As System.Object, ByVal e As System.EventArgs) Handles MyBase.Load
Timer1.Enabled = True
serial_port.Open()

End Sub
Dim data As String
Dim serial_port As New System.IO.Ports.SerialPort("COM1")
Private Sub Timer1_Tick(ByVal sender As System.Object, ByVal e As System.EventArgs) Handles Timer1.Tick
data = serial_port.ReadExisting()
If data.Length > 1 Then
TextBox1.Text = data
data = ""
End If
End Sub
End Class


Monday, August 3, 2009

Simple Database Application using C#,VB.NET

This is my first article so if you are facing any problem or any other topic on which you want help then contact me my email address is
So here i made a simple database application for those who just started visual basic.net or C#.net
i provide the pic base tutorial as well as video based tutorial (soon inshallah)
SO first open your MS-Access and create new debase file its simple to create a database on MS-Access


click new button and chose the blank database from the left corner of your screen as shown below name the database and save it where you want so save it.


Now our database has been created so we have to put some data into so we can access it for database creation we must have know about the table rows entities or relationship so it will be better to do that you must have know about these terms however next step is to create a table in which we put some fields we suppose that our database is just a simple enough like student information :)


so,,


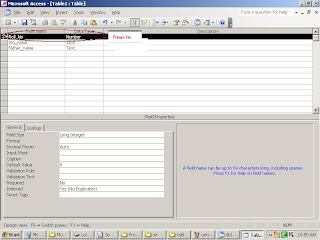
However, now double click on the create table in design view and create the table as shown below


here some thing that i would like to explain you first we have three fields

Roll_no Number

std_name Text

father_name Text

what is primary key its a unique value means the value which will never repeat it self for example if any student have a roll no of 13 then you can not assign any other student roll no 13 means duplication is not allowed in roll no since it is mention that roll no only posses a number.similarly std_name data type and father_name data type is also text.

Now your first table is created you have to save it and name it as you want here i just name the table std_info as shown below

Now we have to put some data in our table that we just created now double click on to the std_info table as show below


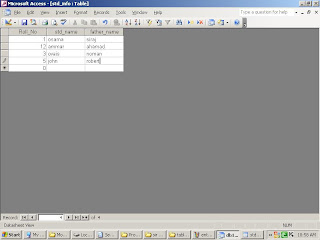
after double click on it you just have to put some data into it so you can access it in future with the help of vb or c#.net
here is the example data as show below


Now you just close the MS-Access now our real work has been started that how we can access this database file with the help of vb.net or c#.net

Remember that our MS-Access file extension is *.mbd.

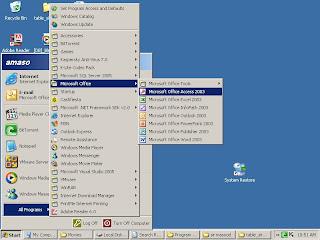
Now open your visual studio click on file and then click on new project as shown below

and now select the language on which you would like to work here i am choosing the C#.net since the database application that i am gonna create here there is not so much different in code of vb.net or c# both having the similarities but i am also give you the code of vb.net i hope it will work out from your side

don't forget to select the path where you want to store it since we are working of GUI so we have to select the windows application it will be much easier for database and most uses

now we have to design the form on which we need three text boxes as we have three fields since we have three fields in our database and four button for

Add for insert new record

Search for search the existing record

Edit for update or edit the any stored record


Delete for delete any record


now our form design is almost complete jsut we are using next is label so it will be easy to understand information that will shown by our text boxes

so our final form looks like that

now the next step is more intresting we have to start to written the code here i am gonna uses the most easier code for creating the database appliaciton and it will be most poweful since mostly pepole done it by using wizard it will be easy but not as much poweful now

Double Click in your form main windiow and include the header file into it or go to the view and then click on to the code as show below


Now include the heder file onto the top of the your code.

C#.NET


using System.Data.OleDb;


VB.NET


Imports System.Data.OleDb
now go to view and select the designer from it and double click on to the form screen and the following code into it


C#.NET

public OleDbConnection conn;
public OleDbCommand comm;
private void Form1_Load(object sender, EventArgs e)
{
string connection = "Provider=Microsoft.Jet.OLEDB.4.0;Data Source=D:\\db1.mdb";
conn = new OleDbConnection(connection);
}


For VB code will be as shown below


now go to the view then slect the designer again or double click on the search button and paste the following code into it..


C#.NET
//find out those record which havin the roll no written in to the textbox
string query = "select * from std_info where roll_no=" + textBox1.Text ;
//pass the query into the database and extract the data accordign to
comm = new OleDbCommand(query, conn);
//open connection
conn.Open();
//uses for data row
OleDbDataReader dr = comm.ExecuteReader();
//if record is found then
if (dr.Read() ==true )
{
//display it into the text boxes
textBox2.Text = dr["std_name"].ToString();
textBox3.Text = dr["father_name"].ToString();
}
else
{
MessageBox.Show("record is not found");
}

VB.NET


Public conn As OleDbConnection
Public comm As OleDbCommand
Private Sub Button1_Click(ByVal sender As System.Object, ByVal e As System.EventArgs) Handles Button1.Click
Dim query As String = "select * from std_info where roll_no=" & Val(TextBox1.Text) & ";"
comm = New OleDbCommand(query, conn)
conn.Open()
Dim dr As OleDbDataReader = comm.ExecuteReader()
If dr.Read() <> False Then
TextBox2.Text = dr("std_name")
TextBox3.Text = dr("father_name")
Else
MessageBox.Show("not found")
End If
conn.Close()

Now similarly we can update.delete or edit our record just we have to change the query in it so for your convenience i am written the code of it you just have to copy it and paste it :)

FOR DELETE

C#.NET

//delete record which havin the roll no written in to the textbox
string query = "Delete from std_info where roll_no=" + textBox1.Text ;
//pass the query into the database and extract the data accordign to
comm = new OleDbCommand(query, conn);
//open connection
conn.Open();
MessageBox.Show("record has been deleted");
conn.Close();

VB.NET

Dim query As String = "Delete from std_info where roll_no=" & Val(TextBox1.Text) & ";"
comm = New OleDbCommand(query, conn)
conn.Open()
MessageBox.Show("Record has been deleted ")
conn.Close()


FOR INSERT
C#.NET

//find out those record which havin the roll no written in to the textbox
string query = "INSERT INTO std_info (roll_no,std_name,father_name) values(" + textBox1.Text+",'"+textBox2.Text+"','"+textBox3.Text+"')";
//pass the query into the database and extract the data accordign to
comm = new OleDbCommand(query, conn);
//open connection
conn.Open();
int a = comm.ExecuteNonQuery();
if (a>0)
Messagebox.show("record has been insert");
VB.NET

Dim query As String = "INSERT INTO std_info (roll_no,std_name,father_name) values(" & TextBox1.Text & ",'" & TextBox2.Text + "','" & TextBox3.Text & "')"
comm = New OleDbCommand(query, conn)
conn.Open()
comm.ExecuteNonQuery()
MessageBox.Show("record has been entered")

FOR EDIT
C#.NET

string query = "UPDATE std_info set std_name='" + textBox2.Text + "',father_name='" + textBox3.Text + "'";
//pass the query into the database and extract the data accordign to
comm = new OleDbCommand(query, conn);
//open connection
conn.Open();
comm.ExecuteNonQuery();
MessageBox.Show("record has been update");

VB.NET

Dim query As String = " UPDATE std_info set std_name='" & TextBox2.Text & "',father_name='" & TextBox3.Text & "'"
comm = New OleDbCommand(query, conn)
conn.Open()
comm.ExecuteNonQuery()
MessageBox.Show("record has been updated")